In a recent Sitecore Content Hub (CH) Product Content Management (PCM) implementation I ran into issue of not having a language selector in the product detail page, and while my project needed a multi-lingual support, we had to look for a way to add this feature and with help from Sitecore Support we were able to add it, in this post will guide you through the process of how you can add such control.

If you're new to CH PCM, its one of the five or sic modules that we have with Sitecore CH, its a management system used to create, categorize, organize, and publish all product-related information. With Sitecore PCM, you stay in control of your product content. Among other things, you can:
- Integrate existing product data with new marketing content to create a single source of truth.
- Streamline the content process in a single platform supporting multiple brands, complex product ranges, lifecycle, and localization.
- View how and where product assets are used across commerce sites, catalogs, mobile apps, signage, point-of-sale, digital kiosks, and more.
With PCM you the functions of adding catalogs and categories which gives you the flexibility to structure and organize your products, it also had the build-in integration through relations with other areas and parts of CH, like integration with the digital assets management module (DAM).
One of the features that you definitely need when working with multilingual implementation as a language switcher in product detail page, if you check on CH version 4.1 and behind you will notice that this is missing and there is no ootb way of adding it. see the following screenshots from the ootb product detail page and notice the missing language selector:

In order to add a rendering you would need to follow the process of adding a component to the right placeholder in the design area within the product detail page, the process involves adding a placeholder component to the desired page, and then swapping that component out for a Language Selector.
The steps are as follows:
As you can see in the following screenshot, you would need to to go to the manage section, then pages, then browse to the product detail page, locate the top right placeholder where you can add a html component:
- Go to Manage > Pages and select the page you wish to add the selector to.
- Add a HTML component in the location you want to selector to be
- Click on the HTML component to open its configuration and take note of the id from the url (the last segment)
- Go to /en-us/admin/entitymgmt/entity/{id}, where {id} is the component id from the previous step
- Click edit
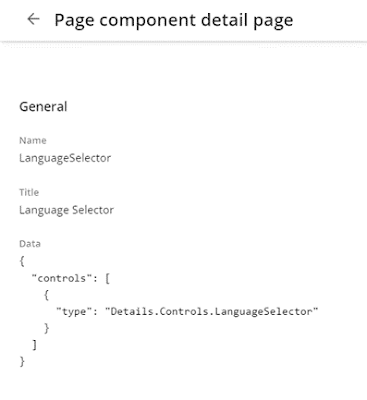
- Set the name to something appropriate, e.g. “LanguageSelector”
- Set Data to {"controls": [{"type": "Details.Controls.LanguageSelector"}]}
- Set Component to Raw
- Set UI Visibility to None
- Click Save

Then once you have that in place, you can open the component configuration, get the id and go to the entity management page, in which you can see the different fields for the component entity, and in there you can update data, visibility, and type of the component:
Once you have that in place, you may need to clear cache from the manage section, the go and refresh the product detail page, you will notice that the language selector is now added to your page and pre-populated with your system languages which you can control/add/delete from within the manage section then languages:


No comments:
Post a Comment